一学就会 2-3 让dbt开跑

上一次教程我们成功的建立了自己的第一个dbt项目并且测试了连接,还没有搞定的小伙伴请参考上一期教程

现在,我们马上开启你的第一次dbt之旅。
还是上次的dbt_tutorial文件夹,大家可以把example文件夹和里面的文件都删除,这里不需要。
第一步,我们在models文件夹下建立一个新的文件夹,叫做public,这个文件夹对应我们数据库中的public schema。我们可以把现有的tables加入到dbt里,这样dbt就能直接使用了。
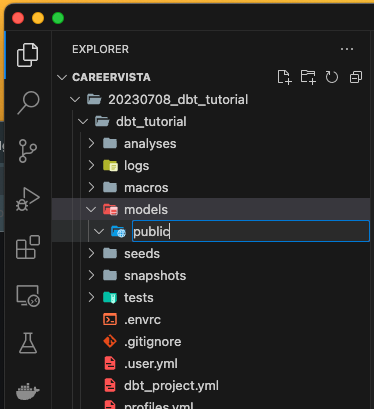
然后,我们在public文件夹下建立一个文件,就起名为sources.yml,我们会用这个文件把所有的table都写进dbt,这样dbt后面就知道怎么调用了。
内容复制粘贴就好:
version: 2
sources:
  - name: pagila
    database: pagila
    schema: public
    tables:
      - name: actor
      - name: film
      - name: film_actor
      - name: film_category
      - name: category
      - name: customer
      - name: address
      - name: city
      - name: country
      - name: inventory
      - name: rental
      - name: payment
      - name: staff
      - name: store
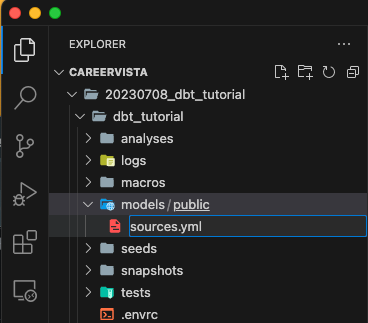
然后,我们再在models文件夹下创建一个新的文件夹叫dw,这个就是我们练习用的folder了。
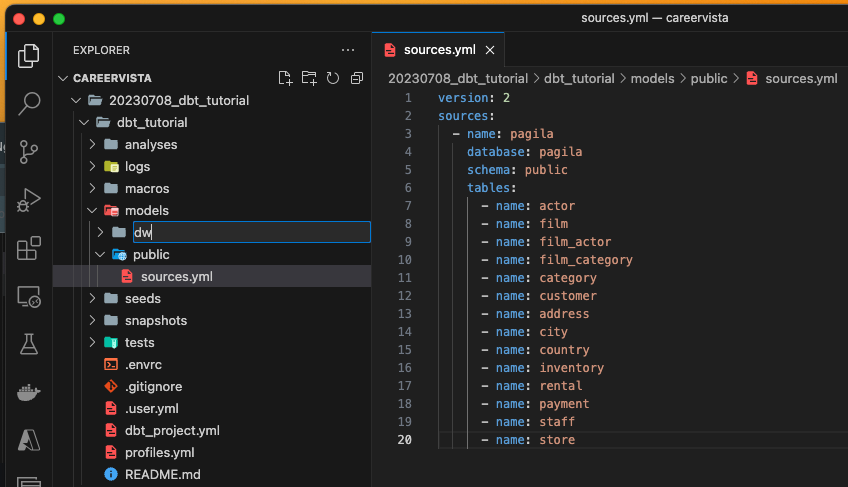
现在我们暂停一下,在VSCode侧边栏找到Extensions,找到dbt Power User,并且安装。
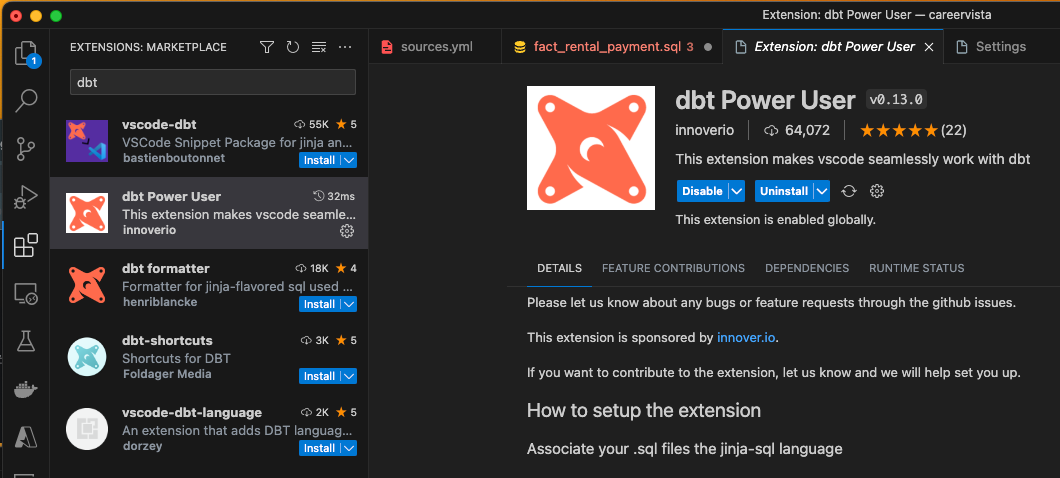
安装完以后,在和我们的dbt_tutorial同一层的文件夹建立一个新文件夹,叫做.vscode,在这个文件夹下,创建一个新文件, 叫做settings.json,里面粘贴下面这些东西:
{
    "files.associations": {
        "*.sql": "jinja-sql"
    }
}
这个呢就是说,每次我们打开这个带有dbt_tutorial的文件夹,vscode会自动读取project settings,这里我们要求vscode读取sql文件的时候使用jinja-sql的语法,避免code下面有红线,好像有错误一样,其实这个并不是我们出错了。具体看下图
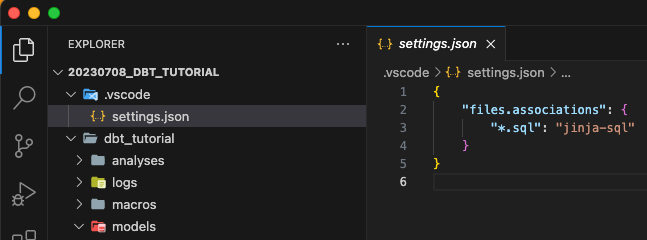
记住,dbt_tutorial和.vscode文件夹都应该存在在同一个上层文件夹下,每次打开你们的project也是打开这个上层文件夹,这样每次vscode就会自动读取刚刚我们的settings.json文件了。
创建我们的第一个model
好了,现在小伙伴们可以回到刚刚项目中,在models文件夹下面建立两个新的文件夹,分别叫staging和prod。
这里简单的解释一下,我们等下会让dbt帮我们在数据库中建立两个schema,一个叫做dw_staging和dw_prod,staging顾名思义就是过度用的表,prod是我们可以expose到所有人的最后能够使用的表。
然后,在staging下面,建立一个子文件夹叫做_staging_fact_rental_payment,这个文件夹下再建立两个文件,分别叫做
_staging_fact_rental_payment.sql和_staging_fact_rental_payment.yml
这两个文件。sql是我们实际要dbt跑的query,yml文件是这个model的注释。
_staging_fact_rental_payment.sql内容如下:
-- _staging_fact_rental_payment.sql
{{
  config(
    materialized='table'
  )
}}

with base as (
select
  r.rental_id,
  r.rental_date,
  r.customer_id,
  i.film_id,
  p.payment_date,
  p.amount
from {{ source('pagila', 'rental') }} as r
join {{ source('pagila', 'payment') }} as p
  on r.rental_id = p.rental_id
join {{ source('pagila', 'inventory') }} as i
  on r.inventory_id = i.inventory_id
)
select *
from base
where amount > 0
大家注意到了么,我们在基本的sql基础上,最上面加上了这一段:
{{
  config(
    materialized='table'
  )
}}
这一小块的内容就是告诉dbt我们这边要create table,默认的情况下是view。当然还有很多其他参数,这里就要靠小伙伴们自己去学习后面了。
再看query部分,我们没有直接写table name,而是用了{{ source('pagila, 'xxxx') }}`来代表我们的table,因为我们刚刚config过了sources.yml所以这里dbt会自动帮我们寻找名字,在实际应用中,我们这里只需要写一个code,根据后面运行dbt指令的时候,它会自动帮我们选择不同环境,dbt会自动帮我们把某一部分替换掉。
例如我们有三个schema,prod,staging和dev,每个schema都有rental table
production:pagila.prod.rental
staging: pagila.staging.rental
dev: pagila.dev.rental
那么我们在production环境运行的时候,dbt会自动帮我们把{{ source('pagila', 'rental') }}这个字段帮我们替换称为pagila.prod.rental。同理,在dev时候跑代码,就会自动替换成:pagila.dev.rental。
_staging_fact_rental_payment.yml文件里面填一下这些就好了,这里我们不需要解释太多这个model是什么,因为fact table的yml会有更详细的信息。
version: 2

models:
  - name: _staging_fact_rental_payment
然后,在刚刚的prod文件夹下,我们建立一个新的子文件夹,叫做:fact_rental_payment。这个就是后面可以使用的fact表了。可能很多小伙伴都猜到了,这个下面我们也要创建.sql和.yml两个文件。
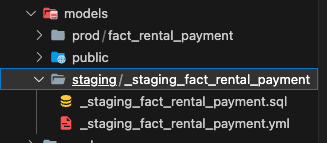
因为我们已经把cleasing/transformation的部分在staging里面做完了,所以fact_rental_payment.sql的内容这里非常简单,我们只需要下面几行就够了:
-- fact_rental_payment.sql

select *
from {{ ref("_staging_fact_rental_payment") }}
注意,这里我们不再用source了,而是用了ref,这个就是告诉dbt在我们的model里面找到一个叫做_staging_fact_rental_payment的表,然后直接使用用这个表的数据。而且我们没有指定materialize的类型,所以默认情况,fact_rental_payment应该是一个view而不是table。
然后我们把fact_rental_payment.yml文件的内容填充进去
version: 2

models:
  - name: fact_rental_payment
    description: "A fact table that contains information about rentals and payments"
    columns:
      - name: rental_id
        description: "Unique identifier for each rental"
        tests:
          - not_null
          - unique
      - name: rental_date
        description: "Date of the rental"
        tests:
          - not_null
      - name: customer_id
        description: "Unique identifier for each customer"
        tests:
          - not_null
      - name: film_id
        description: "Unique identifier for each film"
        tests:
          - not_null
      - name: payment_date
        description: "Date of the payment"
        tests:
          - not_null
      - name: amount
        description: "Amount of the payment"
        tests:
          - not_null
这里,我们定义了每个column都是叫什么,并且dbt会还可以帮我们做相关的validation,如果哪一项fail了,我们可以非常直观的看出来为什么。如果大家不想用tests可以把tests那部分删掉。
删掉tests的简化版如下:
version: 2

models:
  - name: fact_rental_payment
    description: "A fact table that contains information about rentals and payments"
    columns:
      - name: rental_id
        description: "Unique identifier for each rental"
      - name: rental_date
        description: "Date of the rental"
      - name: customer_id
        description: "Unique identifier for each customer"
      - name: film_id
        description: "Unique identifier for each film"
      - name: payment_date
        description: "Date of the payment"
      - name: amount
        description: "Amount of the payment"
至此,我们的model就做好了。在测试之前,我们找到dbt_project.yml文件,进行一些修改,首先把example和下面的那段去掉,因为我们不需要。
但是要在model的部分加上后面这部分:
models:
  dbt_tutorial:
    prod:
      +schema: prod
    staging:
      +schema: staging
首先,我们前面提到的profiles.yml里指定了schema叫做dw,那么下面这个+schema就会在dw基础上为我们建立其他的schema,所有在prod文件夹下的都会进入dw_prod schema下面,而staging文件夹下的都会自动进入dw_staging的schema下面。等下跑完测试大家就知道是怎么回事了。
完整文件如下:
# Name your project! Project names should contain only lowercase characters
# and underscores. A good package name should reflect your organization's
# name or the intended use of these models
name: 'dbt_tutorial'
version: '1.0.0'
config-version: 2

# This setting configures which "profile" dbt uses for this project.
profile: 'dbt_tutorial'

# These configurations specify where dbt should look for different types of files.
# The `model-paths` config, for example, states that models in this project can be
# found in the "models/" directory. You probably won't need to change these!
model-paths: ["models"]
analysis-paths: ["analyses"]
test-paths: ["tests"]
seed-paths: ["seeds"]
macro-paths: ["macros"]
snapshot-paths: ["snapshots"]

clean-targets:         # directories to be removed by `dbt clean`
  - "target"
  - "dbt_packages"


# Configuring models
# Full documentation: https://docs.getdbt.com/docs/configuring-models

# In this example config, we tell dbt to build all models in the example/
# directory as views. These settings can be overridden in the individual model
# files using the `{{ config(...) }}` macro.
models:
  dbt_tutorial:
    prod:
      +schema: prod
    staging:
      +schema: staging
好了,现在我们试试跑一下我们的model,如果成功,我们会看到pigila数据库下会出现两个新的schema一个叫做dw_staging另一个叫做dw_prod。
命令:dbt run -m _staging_fact_rental_payment fact_rental_payment
这里的 -m 指的是我们需要run一个model。也可以用--model代替。同时跑多个model的时候只需要用空格分开就好了。
注意,在terminal里面执行命令的时候一定要在dbt_tutorial文件夹下,使用pipenv的小伙伴还要记得激活你的Python环境,用pipenv shell指令。
如果代码正确,我们就会看到类似下面的东西,可以看到staging table和fact的view都建立好了。

现在回到DBeaver,我们就能看到刚刚两个table在里面了:
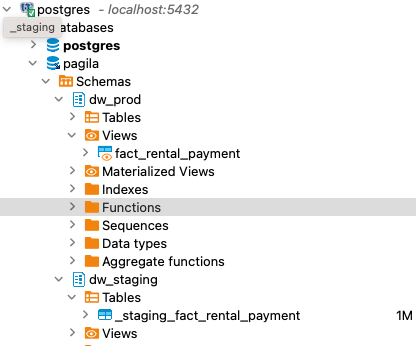
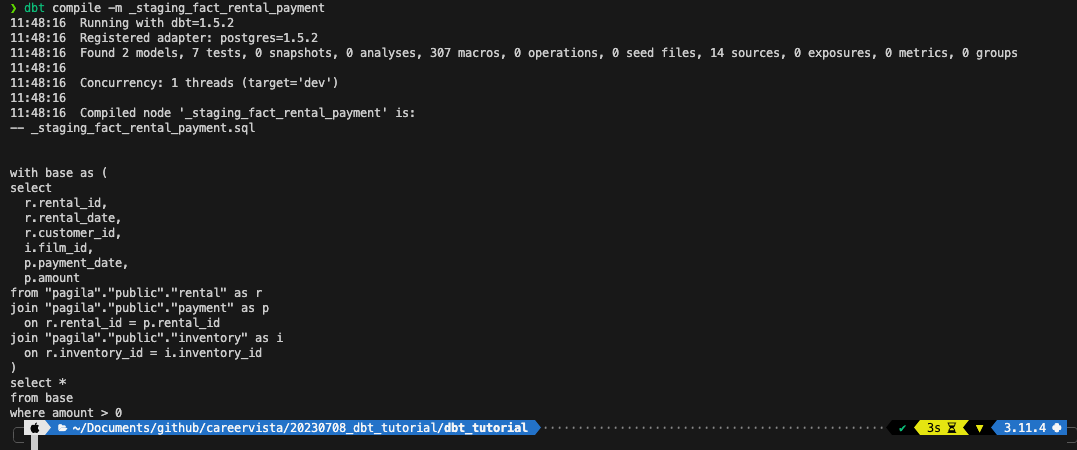
如果大家遇到报错,也不用急,因为dbt在compile我们的代码的时候,会替换table名字并且干掉类似于下面这部分dbt专用的区域:
{{
  config(
    materialized='table'
  )
}}
所以报错时候line number可能就和我们实际的sql文件不太一样,这个时候我们可以在dbt_tutorial文件夹下找到dbt最后使用的query,然后就可以复制粘贴到DBeaver里面自己去debug了。
大家可以看,compiled和run两个文件夹下面都有:
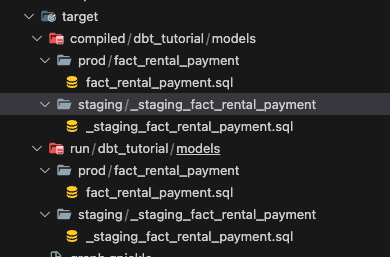
为什么会有两个呢?因为dbt会先尝试compile,验证我们的代码,成功了才回run,当然大家如果不想跑,只想知道query是不是有错,也可以把我们刚刚的dbt run换成dbt compile试试看,那么你新的compiled文件就会只出现在compiled文件夹下了。
好了,至此我们的dbt入门就结束了。小伙伴们有学会dbt的基础么?其实dbt还有很丰富的功能,老徐带领大家的是一个简单的开始,很多设置,例如profiles.yml,dbt_project.yml都是基本只设置一次就再也不用管的了,后面的练习就只在model文件夹下添加和修改就行了。
如果大家有心情练习,老徐给大家一些别的model的descriptions,供大家参考:
Dim Store
This dimension table should contain information about the stores. It should include columns for the store id, manager staff id, and the address id.
Dim Film
This dimension table should contain information about films. It should include columns for the film id, title, description, release year, language id, rental duration, rental rate, length, replacement cost, rating, special features, and full-text index.
Fact Sales
This fact table should contain information about the sales transactions. It should include columns for the sales id, date, customer id, staff id, store id, and the amount paid.
所有的代码,老徐已经上传到github了,大家可以直接下载使用,记得安装相应的Python packages。下面是链接:

